
From Prompt to Code Part 3: Inside Gemini CLI's Safety and Extensibility
In Part 2, we looked at context and tools. Now, we'll cover the advanced topics of sandboxing, user control, and how you can extend the CLI with your own tools.

The Safety Net: Building for Trust and Reliability
Allowing an AI to modify your local environment requires a reliable system. The Gemini CLI is engineered with safety and reliability features that give you full control.

Shell Sandboxing
Allowing an LLM to execute arbitrary shell commands is risky. The Gemini CLI mitigates this through a sandboxing system. On macOS, it uses the built-in "Seatbelt" framework with declarative profile files (.sb). Here’s what a profile looks like, based on the files in packages/cli/src/utils/sandbox-macos-permissive-open.sb:
(version 1)

;; allow everything by default
(allow default)

;; deny all writes EXCEPT under specific paths
(deny file-write*)
(allow file-write*
    (subpath (param "TARGET_DIR"))
    (subpath (param "TMP_DIR"))
    (subpath (param "CACHE_DIR"))
    (subpath (string-append (param "HOME_DIR") "/.gemini"))
    (subpath (string-append (param "HOME_DIR") "/.npm"))
    (subpath (string-append (param "HOME_DIR") "/.cache"))
    (subpath (string-append (param "HOME_DIR") "/.gitconfig"))
    (literal "/dev/stdout")
    (literal "/dev/stderr")
    (literal "/dev/null")
)
You enable it in your project's .gemini/settings.json:
{
  "sandbox": "docker"
}
You can switch between different built-in profiles like
permissive-open(the default) andrestrictive-closed(which denies network access) or even provide your own custom.sbprofile file for fine-grained control.
User in the Loop: The Confirmation System
A core design principle of the Gemini CLI is keeping the user in control. The agent will not perform potentially destructive actions without explicit user approval. This is managed by the shouldConfirmExecute method, a required part of the Tool interface defined in packages/core/src/tools/tools.ts.

Before executing a tool like shell or edit, the scheduler calls this method. If it returns a ToolCallConfirmationDetails object, the CLI pauses and displays a confirmation prompt to the user. For example, when running a shell command, it prepares the following details for the UI:
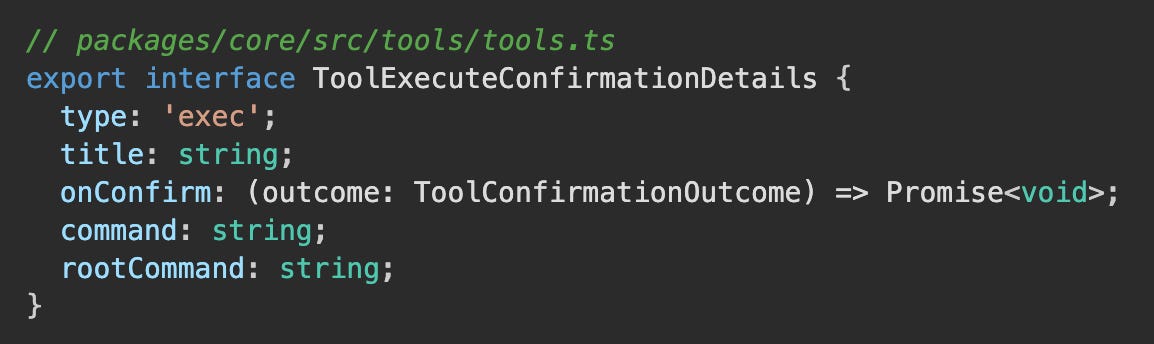
This ensures that you always have the final say before any changes are made to your system.
Never Lose Your Place: The Checkpointing System
Losing your session state is frustrating. Gemini CLI solves this with a checkpointing system that is more robust than a simple history file.
When you approve a file system change, Gemini CLI doesn't just save the conversation history. It creates a full Git snapshot of your project in a special shadow repository (~/.gemini/history/<project_hash>), as implemented in packages/core/src/services/gitService.ts. This doesn't interfere with your own Git history. The /restore command reverts your project files using this Git snapshot, giving you a true, point-in-time recovery.
Making It Yours: From Daily Use to Full Automation
A great developer tool needs to be both customizable for daily use and scriptable for automation. Gemini CLI handles both.
Beyond the Code: Configuration and Theming
The CLI experience is configurable. in packages/cli/src/config/settings.ts shows that settings are loaded from settings.json files:

You can configure everything from your theme to complex tool servers.
// Example .gemini/settings.json
{
  "theme": "Dracula",
  "fileFiltering": {
    "respectGitIgnore": true
  },
  "mcpServers": {
    "myPythonServer": {
      "command": "python",
      "args": ["mcp_server.py"],
      "cwd": "./mcp_tools/python"
    }
  }
}
The Automation Engine: Non-Interactive Mode
Using Gemini CLI in scripts is crucial for automation. As in packages/cli/src/nonInteractiveCli.ts confirms, you can pipe content directly into the CLI for single-shot execution:
# Example from docs/cli/index.md for non-interactive use
echo "What is fine tuning?" | gemini

# This is equivalent to using the -p flag
gemini -p "What is fine tuning?"
The CLI detects that stdin is not a TTY and runs in a simplified mode perfect for scripting.
Extensibility: Model Context Protocol (MCP)
This protocol allows developers to expose their own custom tools to Gemini CLI by running a local server.
1. Configuration in settings.json
Gemini CLI discovers these servers through the mcpServers object in your .gemini/settings.json file. The configuration is flexible, supporting both command-based and HTTP-based servers, as shown in packages/cli/src/config/config.ts:

Here are a couple of examples of what you might put in your settings.json:
// Example .gemini/settings.json
"mcpServers": {
  "myPythonServer": {
    "command": "python",
    "args": ["mcp_server.py"],
    "cwd": "./mcp_tools/python"
  },
  "myHttpServer": {
    "httpUrl": "http://localhost:8080/mcp",
    "headers": {
      "Authorization": "Bearer your-api-token"
    }
  }
}
2. Discovery and Registration
When the Gemini CLI starts, it calls the discoverMcpTools function in packages/core/src/tools/mcp-client.ts. This function iterates through the configured servers, connects to them, and retrieves the list of tools they offer.

Each discovered tool is then registered in the ToolRegistry.
3. Serving Tools to the Model
When Gemini CLI makes a request to the Gemini API, it includes the schemas of all registered tools. The getFunctionDeclarations method of the ToolRegistry is responsible for this in packages/core/src/tools/tool-registry.ts:

This is how the model becomes aware of your custom tools and can request their execution.
The MCP integration supports multiple transport mechanisms (Stdio, SSE, and HTTP) and even has built-in conflict resolution. If two of your MCP servers expose a tool with the same name, Gemini CLI automatically prefixes the tool name with the server name from your config (e.g.,
myPythonServer__get_user_details) to prevent collisions, as seen in packages/core/src/tools/mcp-client.ts:

Final Thoughts
This is the final post in our developer-focused series on the Gemini CLI. By peeling back the layers, we see it's a framework for building an interactive, context-aware, and extensible AI agent for the command line. The separation of concerns, the tool-use architecture, and the multi-tiered context management all point to a project with a solid foundation.
Recap
From Prompt to Code Part 1: Inside the Gemini CLI's Execution Engine
From Prompt to Code Part 2: Inside Gemini CLI's Memory and Tools
So go ahead, clone the repo, and start exploring. The best way to understand a tool is to read the code and documentation that bring it to life.